


Blogger has enabled you to change the owner or Administrator for your blog. You can also use this method to transfer a blog to another Gmail Account.
This is useful when you want to separate your public and private blogs. Then your private profile will not show on your public blog and vice-versa. The profile problem can also be solved by deleting the profile widget and putting in a HTML widget.
STEPS TO TRANSFER BLOG
1. Login to Blogger Dashboard.
2. Click on Settings on Dahboard for the blog you wish to transfer. Under Settings tab click on Permissions.
3. Under Blog Authors click the 'ADD AUTHOR' button. Copy and paste or type in the email address of the person you wish to invite or that of your second email account and click on Invite.
4. Email is sent to the invited account. Open your Gmail for that account and open that Email. You will see the following message :
The Blogger user XXXXX has invited you to contribute to the private blog: BLOG TO BE TRANSFERRED
To contribute to this blog, visit:
http://www.blogger.com/i.g?inviteID=XXXXXXXXX
You'll need to sign in with a Google Account to confirm the invitation and start posting to this blog. If you don't have a Google Account yet, we'll show you how to get one in minutes.
If you are already a Blogger user, please note that this blog uses the new version of Blogger. To post to XXXXX's blog, you will access this new version with a Google account, instead of your Blogger account.
To learn more about Blogger and starting your own free blog visit http://www.blogger.com.
Click the Invite Link.
5. Clicking link opens a new window with :
XXXXX has invited you to contribute to the blog
BLOG TO TRANSFER
http://BLOGTOTRANSFER.blogspot.com/
To join this blog as an author, accept the invitation by signing in with your Account below.
Don't have a Google Account? Create your account now
6. Sign up for Blogger
Once you complete this process, you'll be able to log in to Blogger using your Google account email and password.
Email address INVITED@gmail.com Use a different account
Your name INVITED
Display name The name used to sign your blog posts.
Acceptance of Terms I accept the Terms of Service Indicate that you have read and understand Blogger's Terms of Service
Continue
Click Continue. Blogger.com/home will open with the new blog on your Dashboard. As you are only having a Guest Account you can only post.
7. Then repeat Steps 1 and 2. You will now see your second account as Guest under the Permissions subtab of Settings tab. Click on 'Guest' link and it will change to 'Administrator'.
8. Go to your second (invited) account and under Settings---->Permissions click Remove link for the first account. See the entire process for two bloggers summarized in the picture below :
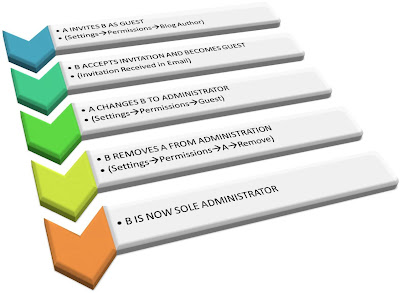
Click on picture to enlarge it.


