Friday, December 16, 2011 | By: BG4U-BLOGS

How To Change Blog Owner?

Blogger has enabled you to change the owner or Administrator for your blog. You can also use this method to transfer a blog to another Gmail Account.


This is useful when you want to separate your public and private blogs. Then your private profile will not show on your public blog and vice-versa. The profile problem can also be solved by deleting the profile widget and putting in a HTML widget.


STEPS TO TRANSFER BLOG


1. Login to Blogger Dashboard.


2. Click on Settings on Dahboard for the blog you wish to transfer. Under Settings tab click on Permissions.


3. Under Blog Authors click the 'ADD AUTHOR' button. Copy and paste or type in the email address of the person you wish to invite or that of your second email account and click on Invite.


4. Email is sent to the invited account. Open your Gmail for that account and open that Email. You will see the following message :

The Blogger user XXXXX has invited you to contribute to the private blog: BLOG TO BE TRANSFERRED

To contribute to this blog, visit:
http://www.blogger.com/i.g?inviteID=XXXXXXXXX

You'll need to sign in with a Google Account to confirm the invitation and start posting to this blog. If you don't have a Google Account yet, we'll show you how to get one in minutes.

If you are already a Blogger user, please note that this blog uses the new version of Blogger. To post to XXXXX's blog, you will access this new version with a Google account, instead of your Blogger account.

To learn more about Blogger and starting your own free blog visit http://www.blogger.com.

Click the Invite Link.


5. Clicking link opens a new window with :

XXXXX has invited you to contribute to the blog
BLOG TO TRANSFER
http://BLOGTOTRANSFER.blogspot.com/
To join this blog as an author, accept the invitation by signing in with your Account below.

Don't have a Google Account? Create your account now


6. Sign up for Blogger
Once you complete this process, you'll be able to log in to Blogger using your Google account email and password.
Email address INVITED@gmail.com Use a different account
Your name INVITED
Display name The name used to sign your blog posts.
Acceptance of Terms I accept the Terms of Service Indicate that you have read and understand Blogger's Terms of Service

Continue
Click Continue. Blogger.com/home will open with the new blog on your Dashboard. As you are only having a Guest Account you can only post.


7. Then repeat Steps 1 and 2. You will now see your second account as Guest under the Permissions subtab of Settings tab. Click on 'Guest' link and it will change to 'Administrator'.


8. Go to your second (invited) account and under Settings---->Permissions click Remove link for the first account. See the entire process for two bloggers summarized in the picture below :
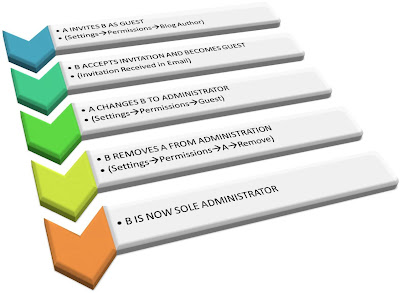

Click on picture to enlarge it.


source : http://www.blogdoctor.me
Sunday, August 7, 2011 | By: Unknown

Image Widget for Blogget

about adiWidget™

adiWidget™ is the pioneer for the static corner image widget for blogger. Developed since September 2007, the idea is now has been used by many other web developer. Instead of static png image, you can now add flash and gif image format in every corner of your blog. But the position of the image is still remain static at the corner of your page. It can be used to give the mood of your web with any image that you want. All of the items here are FREE! So, enjoy then... It is advised that you use the latest browser i.e IE7 and Firefox. adiWidget™ is not compatible with IE6 or below. Please READ the TUTORIAL if you want to know how to apply adiWidget™ in your site. If you have any questions, want to contribute images for adiWidget™ or anything personally, you are welcome to e-mail at adiwira[at]gmail.com.
Wednesday, July 27, 2011 | By: Unknown

How to add Share Buttons on Blogger

1. Go to Design > edit HTML > check “Expand Widget Templates” > Search [ press: CTRL + F ]
<div class='post-footer'>

2. Now REPLACE it with the following code and SAVE
<p><div class='post-share-buttons'>
<b:include data='post' name='shareButtons'/>
</div></p>
<div class='post-footer'>
Wednesday, June 29, 2011 | By: Unknown

10 Blogger tools for bloggers

 When we doing blogging. we have to use many more tools for different different works.If we search on the Google search we can find various category of tools. I have some collection of  tools site.its really helpful for blogger.i thought to share with you.


blogger-tools,bloggertricks,blogging,tools for blogger

1.  blogflux.com
This is providing you everything you need to get your blog up and running. From a blog directory, to themes, stat tracking, and advanced services like our poll and quiz makers, Blogflux is the only resource you need to get your blog online

2. htmlkit.com
If you want to make favicon. It helps to make favicon by image.(Add favicon to your blog.)

3.feedburner.com
This helps to add Rss feed feature to your blog.

4 .flickr.com
Good place to share ans store your images.almost certainly the best online photo management and sharing application in the world

5. backpackit.com
Best place to  organizetodo, note,remindersand list easily and keep one place all the time.

Picasa is free photo editing software from Google that makes your pictures look great.
Sharing your best photos with friends and family is as easy as pressing a button!

7. gabbly.com
Live chat site for blogger. easy to chat with others


8. talkdigger.com
you can join this site and follow others and start conversation

9. tinyurl.com
make your URL tiny. its really helpful

10. swicki.eurekster.com
new type of search engine for web community.it combine with wiki .

50 Search Engine for submit your website

When we running blog, main thing is traffic. we all are trying to drive more traffic for our website.so search engines are more important.because people are get the information by searching on search engine.if we submit out site to search engine, it will help to drive traffic for our site.today i got 50 search engine.you can submit your site to there and get more traffic.ill give submit link with this, i t will more easy to you.


search engine,seo,seo tips,submit,google,yahoo,bing

1. Google.com      Submit
2. Yahoo.com     Submit
3. Bing.com      Submit 
4. myahint.com      Submit
5. aboveredirect.com      Submit
6. amfibi.com       Submit
7. search-o-rama.com      Submit
8. igwanna.com      Submit
9. ghetosearch.com      Submit
10.  boitho.com      Submit
11. searchramp.com      Submit
12. webportalguide.com      Submit
13. searchbox.info       Submit
14. primesearchresults.com      Submit
15. hiseek.info      Submit
16. hotsitesearch.info      Submit
17. morewebsearch.info      Submit
18.  smartsearchguide.com       Submit
19. findthatwebsite.com       Submit
20.  www.search-blast.info     Submit
21. webportalguide.com        Submit
22. searchitguide.info       Submit
23. findsimilarpages.com       Submit
24. search-blast.info      Submit
25. helpyousearch.info      Submit
26. mysearchpilot.com       Submit
27. theoriginalsearchengine.com      Submit
28.  searchbox.info      Submit
29. fdrsearch.info      Submit
30.  drsearch.info      Submit
31. ineedsearch.info       Submit
32. searchingportal.info       Submit
33. www.localsearchengine.info        Submit
34.searchingguru.info       Submit
35. searchingguru.info       Submit
36. allbestsearch.info      Submit
37. homebusinessdatacenter.com       Submit
38.  bestinternetsearch.info      Submit
39. mouse-click.de      Submit
40.  webmaster-tools.com       Submit
41. dir.guruji.com       Submit
42. websquash.com       Submit
43. fybersearch.com      Submit
44. whatuseek.com      Submit
45. mixcat.com         Submit
46. entireweb.com      Submit
47. scrubtheweb.com        Submit
48.  searchsight.com       Submit
49. sonicrun.com      Submit
50.  acoon.com        Submit

How to add related post with thumbnail to blogger

How to add related post with thumbnail to blogger

1. Log it to your blogger and go to Design >> Edit HTML

2. First,download the present template as a backup.

3.Make sure you put check mark to “Expand Widget Templates

4.Find this tag by using Ctrl+F </ head>


5. Paste below code before  </ head> tag

<!--Related Posts with thumbnails Start-->
<b:if cond='data:blog.pageType == &quot;item&quot;'>
<style type='text/css'>
#related-posts {
float:center;
height:100%;
min-height:100%;
padding-top:10px;
padding-left:15px;
padding-right:15px;
}

#related-posts h2{
font-size: 1.3em;
color: black;
font-family: Arial;
margin-bottom: 0.75em;
}

#related-posts a{
color:black;
}

#related-posts a:hover {
background-color:#eeeeee;
}
</style>
<script type='text/javascript'>
var defaultnoimage="https://blogger.googleusercontent.com/img/b/R29vZ2xl/AVvXsEgflGnV33eDlOlE7ssE0Jpd-XNUukYE2K9cr9icj3ipU-xya3rKZbDA4MlFAZTduapuv3aP7wUVDJFpfX3-TqGPFwo77enyiOG50jh5ecUibw3wCN280IqneiiwnkLMfOVM8_VDeQkR5T3Q/";
var maxresults=5;
var splittercolor="#cccccc";
var relatedpoststitle="Related post";
</script>

</b:if>
<!--Related Posts with thumbnails End-->

6. Search this code again <p class='post-footer-line post-footer-line-1'/> Or post-footer-line

7. Paste below code after one of above code

<!-- Related Posts with Thumbnails Code Start-->
<!-- remove --><b:if cond='data:blog.pageType == &quot;item&quot;'>
<div id='related-posts'>
<b:loop values='data:post.labels' var='label'>
<b:if cond='data:label.isLast != &quot;true&quot;'>
</b:if>
<script expr:src='&quot;/feeds/posts/default/-/&quot; + data:label.name + &quot;?alt=json-in-script&amp;callback=related_results_labels_thumbs&amp;max-results=6&quot;' type='text/javascript'/></b:loop>
<script type='text/javascript'>
removeRelatedDuplicates_thumbs();
printRelatedLabels_thumbs(&quot;<data:post.url/>&quot;);
</script>
</div><div style='clear:both'/>
<!-- remove --></b:if>
<!-- Related Posts with Thumbnails Code End-->

8.  Now Save template .you are done.

* Replace  with Related post as your like
* Replace  with 5 for changing post amount on related post

How to add animated recent post widget

How to add animated recent post widget

1. Log in to blogger and Go to  Design >> Page Element.

2. Click Add Gadget and select 'HTML/Javascript'

3.Paste below code.

<script src="http://ajax.googleapis.com/ajax/libs/jquery/1.3.2/jquery.min.js" type="text/javascript"></script>     
<style type="text/css" media="screen">      
<!-- 
#spylist {     
overflow:hidden;      
margin-top:5px;      
padding:0px 0px;      
height:350px;      
}      
#spylist ul{      
width:220px;      
overflow:hidden;      
list-style-type: none;      
padding: 0px 0px;      
margin:0px 0px;      
}      
#spylist li {      
width:208px;      
padding: 5px 5px;      
margin:0px 0px 5px 0px;      
list-style-type:none;      
float:none;      
height:70px;      
overflow: hidden;      
background:#fff url(http://dl.getdropbox.com/u/708209/scriptabufarhan/recentspy/post.jpg) repeat-x;      
border:1px solid #ddd;      
}     #spylist li a {     
text-decoration:none;      
color:#4B545B;      
font-size:11px;      
height:18px;      
overflow:hidden;      
margin:0px 0px;      
padding:0px 0px 2px 0px;      
}      

#spylist li img {      
float:left;      
margin-right:5px;      
background:#EFEFEF;      
border:0;      
}      
.spydate{      
overflow:hidden;      
font-size:10px;      
color:#0284C2;      
padding:2px 0px;      
margin:1px 0px 0px 0px;      
height:15px;      
font-family:Tahoma,Arial,verdana, sans-serif;      
} 

.spycomment{     
overflow:hidden;      
font-family:Tahoma,Arial,verdana, sans-serif;      
font-size:10px;      
color:#262B2F;      
padding:0px 0px;      
margin:0px 0px;      
} 
-->
</style>
 <script language='JavaScript'> 


imgr = new Array();

imgr[0] = "http://i43.tinypic.com/orpg0m.jpg";

imgr[1] = "http://i43.tinypic.com/orpg0m.jpg";

imgr[2] = "http://i43.tinypic.com/orpg0m.jpg";

imgr[3] = "http://i43.tinypic.com/orpg0m.jpg";

imgr[4] = "http://i43.tinypic.com/orpg0m.jpg";
showRandomImg = true;

boxwidth = 255;

cellspacing = 6;

borderColor = "#232c35";

bgTD = "#000000";

thumbwidth = 70;

thumbheight = 70;

fntsize = 12;

acolor = "#666";

aBold = true;

icon = " ";

text = "comments";

showPostDate = true;

summaryPost = 40;

summaryFontsize = 10;

summaryColor = "#666";

icon2 = " ";

numposts = 10;

home_page = "http://www.bloggertrix.com/";

limitspy=4
intervalspy=4000

</script>

<div id="spylist">
    <script src='http://dl.getdropbox.com/u/708209/scriptabufarhan/recentspy/recentpostthumbspy-min.js' type='text/javascript'></script>
</div> 

* Replace http://www.bloggertrix.com/ with your site URL

4. Click save you are done.

How to add Beautiful Rss Subscribe Box to blogger

How to add Beautiful Rss Subscribe Box to blogger


feed burner,rss follower

This gadget is helps to get more RSS reader.

1.  Log in to your blogger account and Go to Design >> Page Element

2. Click Add Gadget and select 'HTML/Javascript'

3. Paste below one of below code.

<div class="rss_box">Sign up to receive latest Update free</div>
                <form action="http://feedburner.google.com/fb/a/mailverify" method="post" target="popupwindow" onsubmit="window.open
('http://feedburner.google.com/fb/a/mailverify?uri=YOUR FEED BURNER ID', 'popupwindow', 'scrollbars=yes,width=550,height=520');return true" id="rss_form">
                    <input type="text" name="email" id="email_rss" value="Enter your email!" onblur="if (this.value == '') {this.value = 'Enter your email!';}"  onfocus="if (this.value == 'Enter your email!') {this.value = '';}" />
                    <input type="submit" name="subscribe_email_btn" id="subscribe_email_btn" value="" />
                    <input type="hidden" value="technology/tricks" name="uri"/>

                    <input type="hidden" name="loc" value="en_US"/>
                </form>
<style>
.rss_box { /*in content */
    display: block;
    background-image:url(http://www.technologytricks.com/themes/techified/wp-content/themes/techified/images/rss_icon.jpg);
    background-repeat:no-repeat;
    padding-left: 40px;
    height: 40px;
    border: 0;
}
#sidebar #rss_form { /*in content */
}
#rss_form #email_rss {
    background: none;
    border: 1px solid #CCCCCC;
    margin: 0px 0px 0px 7px;
    padding: 2px 3px 0px 30px;
    width: 182px;
    height: 18px;
    outline: 0;
    color:#666666;
    -moz-border-radius: 5px;
    border-radius: 5px;
    -webkit-border-radius: 5px;
    font-size:12px;
    background-image:url(http://www.technologytricks.com/themes/techified/wp-content/themes/techified/images/email.png);
    background-repeat:no-repeat;
    background-position: 5px 3px;
}
#rss_form #subscribe_email_btn {
    width:50px;
    height:21px;
    border:none;
    background:url(http://www.technologytricks.com/themes/techified/wp-content/themes/techified/images/go.png) no-repeat;
    cursor:pointer;
    margin-left: 7px;
}

</style>

*Replace YOUR FEED BURNER ID with your Feed URL

4. Save HTML/Javascript. you are done.
Related Posts Widget for Blogger

Cool Jquery Slide Show to Your blogger Part 2

 This is nice slide show to your blogger,add it and make your blog attractive.


1. Log in to your blogger account and Go to Design >> Edit HTML

2. Find this tag by using Ctrl+F    </head>

3. Paste below code before </head> tag

<script src='http://ajax.googleapis.com/ajax/libs/jquery/1.4.2/jquery.min.js' type='text/javascript'></script>

<script type='text/javascript'>
//<![CDATA[

$(document).ready(function() {

//Execute the slideShow, set 6 seconds for each images
slideShow(3000);

});

function slideShow(speed) {


//append a LI item to the UL list for displaying caption
$('ul.slideshow').append('<li id="slideshow-caption" class="caption"><div class="slideshow-caption-container"><h3></h3><p></p></div></li>');

//Set the opacity of all images to 0
$('ul.slideshow li').css({opacity: 0.0});

//Get the first image and display it (set it to full opacity)
$('ul.slideshow li:first').css({opacity: 1.0});

//Get the caption of the first image from REL attribute and display it
$('#slideshow-caption h3').html($('ul.slideshow a:first').find('img').attr('title'));
$('#slideshow-caption p').html($('ul.slideshow a:first').find('img').attr('alt'));

//Display the caption
$('#slideshow-caption').css({opacity: 0.7, bottom:0});

//Call the gallery function to run the slideshow
var timer = setInterval('gallery()',speed);

//pause the slideshow on mouse over
$('ul.slideshow').hover(
        function () {
                clearInterval(timer);
        },
        function () {
                timer = setInterval('gallery()',speed);
        }
);

}

function gallery() {


//if no IMGs have the show class, grab the first image
var current = ($('ul.slideshow li.show')?  $('ul.slideshow li.show') : $('#ul.slideshow li:first'));

//Get next image, if it reached the end of the slideshow, rotate it back to the first image
var next = ((current.next().length) ? ((current.next().attr('id') == 'slideshow-caption')? $('ul.slideshow li:first') :current.next()) : $('ul.slideshow li:first'));

//Get next image caption
var title = next.find('img').attr('title');
var desc = next.find('img').attr('alt');

//Set the fade in effect for the next image, show class has higher z-index
next.css({opacity: 0.0}).addClass('show').animate({opacity: 1.0}, 1000);

//Hide the caption first, and then set and display the caption
$('#slideshow-caption').animate({bottom:-70}, 300, function () {
                //Display the content
                $('#slideshow-caption h3').html(title);
                $('#slideshow-caption p').html(desc);
                $('#slideshow-caption').animate({bottom:0}, 500);
});

//Hide the current image
current.animate({opacity: 0.0}, 1000).removeClass('show');

}

//]]>
</script>

<style type="text/css">
ul.slideshow {
list-style:none;
width:400px;
height:250px;
overflow:hidden;
position:relative;
margin:0;
padding:0;
font-family:Arial,Helvetica,Trebuchet MS,Verdana;
;
}
ul.slideshow li {
position:absolute;
left:0;
right:0;
}
ul.slideshow li.show {
z-index:500;
}
ul img {
width:400px;
height:250px;
border:none;
}
#slideshow-caption {
width:500px;
height:70px;
position:absolute;
bottom:0;
left:0;
color:#fff;
background:#000;
z-index:500;
}
#slideshow-caption .slideshow-caption-container {
padding:5px 10px;
z-index:1000;
}
#slideshow-caption h3 {
margin:0;
padding:0;
font-size:16px;
}
#slideshow-caption p {
margin:5px 0 0 0;
padding:0;
}
</style>

If you want, you can change image width and height (highlighted with different color)

4. Now Go to Design >>page Element

5.Click Add gadget  and Select HTML/JavaScript 

6. Now paste paste below code

<ul class="slideshow">

<li><a href="#"><img src="https://blogger.googleusercontent.com/img/b/R29vZ2xl/AVvXsEjTkK6EiaBR04C8lshuEhxfH5WbuganWKmLjspm9og45ip2tnUu7Vf1Y0cynly_M-JjA2Wc2vwmDpY5hm3bm6z_rJwpakh7Hr0nlC8DPu2Z0kC7dT38ucVgo4406trIjK2CvYnIYQQ2QhDP/s1600/image+4.jpg" title="Image 1 title here" alt="Image 1 Description here" /></a></li>

<li><a href="#"><img src="https://blogger.googleusercontent.com/img/b/R29vZ2xl/AVvXsEiGcknq-9H-A7yw8ANXgC9eX1v-fETHA2ejJ3jMgZcFDMkdGAkvNG6RZBOY0SrEqCa35bo227zkzhFZA3iH7AqRmY5wTeJVF3KAVZ5X9zpuzwTehdTs7Ru_dHkeX5SJKdP6jNU9jwiYOETG/s1600/image+1.jpg" title="Image 2 title here" alt="Image 2 Description here" /></a></li>

<li><a href="#"><img src="https://blogger.googleusercontent.com/img/b/R29vZ2xl/AVvXsEi2H1F70UmuEA16foxXIlX-JxL04c7rbnjr9CACpn1MZDlYh3XxrCE5KyZBCT1C3YXMoTewSuLHUWRpQ9d3Y1hnd_1xiwWxy7y2dWRMEIpb4Y8ITx5GRKZhuR_g0PuvWe8QtY2By0kShOLG/s1600/image+3.jpg" title="Image 3 title here" alt="Image 3 Description here" /></a></li>

<li><a href="#"><img src="https://blogger.googleusercontent.com/img/b/R29vZ2xl/AVvXsEi3NYere3nEXG5FLVcHZimJkFLbS4ZB5LR8OMoedEzzU3gEl2r_cP19uTu6WV1pga7MBkr7pi5I5fv-QsEn3W_WKrzR5TEwATcWqb0kuFdSvxAx8UklnukU8IRc_PO223Z2o3pEN66QG2Fs/s1600/bla_image.png" title="Image 4 title here" alt="Image 4 Description here" /></a></li>
</ul>

Replace # your URL
Replace Red color words with  image title
Replace Red color words with  image description

7. Now save  HTML/JavaScript  
You are done.

Cool Drop Down Menu For Blogger

 This is cool drop down menu for your blogger.


1. Log in to your blogger account and Go to Design >> Edit HTML

2. Put checked marked in Expand Widget Templates

3. Find this tag by using Ctrl+F    ]]></b:skin>

4. Paste below code after ]]></b:skin> tag

.wrapper1{
color: #44433f;
font: 14px "Futura Medium", "Myriad Pro", "Gill Sans", Helvetica, Verdana, Arial, sans-serif;
margin: 0;
padding: 4px 0 0;
}
.wrapper1 a{
color: #E5F2FB;

text-decoration: none;

}

.wrapper1 a:hover {

color: #09548B;

}

.wrapper1 p {

margin: 0 0 17px;

padding: 0;

line-height: 18px;

}

.wrapper {

/*width: 710px;*/

margin: 20px auto;

}

.nav {

background: #fff url(https://blogger.googleusercontent.com/img/b/R29vZ2xl/AVvXsEjjdsNxR-4oB6UI9o18Eiyk5Vpd4KLRb15lE4XX7LapAXlfg_CR6UtxL1ItcKSB-uQy6JuSbiDy8b5Ty0jp4MWM3pJQvppJh-nI4INS5_pHPk51ilIBPJ3VW5btcTMYrJ8JXuK4VRR3tk_L/s1600/nav_bg.png) repeat-x;

float: left;

}

.nev-wrapper {

clear: both;

float: left;

}

.nav-left {

background: url(https://blogger.googleusercontent.com/img/b/R29vZ2xl/AVvXsEg5gaWuBCxgv-81x5P_7udhy2okcT2B7bFQsbUTSC1ueSZSaNKPUDbZjNLGjCeUx8-2KWdQnvjuWY0-b-WJGY2a_dFlx8tCVQkN-fAbynufz9O6cxCRjneZsP5HGNObL-dUCHiDUOqj70Yr/s1600/nav_left.png) no-repeat top left;

float: left;

width: 11px;

height: 41px;

}

.nav-right {

background: url(https://blogger.googleusercontent.com/img/b/R29vZ2xl/AVvXsEjA4Hv9ZyIhZZBFW2D-yhLEPF_3vvZ5QUOUjH88UhodNWfVJaJT1xv2WB0y-xvlLWD6xNRTq-7OAh97PnygfLh8klpphCBQvRM1LVSB05TdNd4aML6NRIxY85gp3XjN997GSaAGf_8pqrA8/s1600/nav_right.png) no-repeat top right;

float: left;

width: 11px;

height: 41px;

}

.nav ul {

/*width: 648px;*/

height: 38px;

float: left;

margin: 0;

padding-top: 3px;

list-style: none;

font-size: 15px;

}

.nav li {

float: left;

padding: 0 7px;

background: url(https://blogger.googleusercontent.com/img/b/R29vZ2xl/AVvXsEixzF1AMaEqBR_mqddHSnJMpTfumEL1ltXjX46sGK_Ehb0mzMHUv39GUvf_IrTkkEIt8EpoUOnNDVDRjLLJftK0J0cKwh7EIRasFqGUrtgyL5WJwkgrO2hV7vhTtJ7mda2sKtEXtQqe3-yR/s1600/split.png) no-repeat right center;

position: relative;

z-index: 1;

}

.nav li.last {

background:none;

}

.nav li:hover {

z-index:2;

}

.nav li a {

display: block;

line-height: 38px;

overflow: hidden;

float: left;

}

a .menu-left {

background: url(https://blogger.googleusercontent.com/img/b/R29vZ2xl/AVvXsEhj1trJM0qe8P80F9snDoIexc8XYMXpNR0MulhwH5Wlt1owAABqvyVASk869IhACBgcsh_xi-wYTJ1d2RYDHf1zv_JrXdqwsLhEetKUYBLQKcLUmU0rX9PwSoqXqNq4tkrwSneEZe0-RLLU/s1600/menu_left.gif) no-repeat left top;

width: 8px;

height: 32px;

line-height: 35px;

display: block;

float: left;

}

a .menu-mid {

background: url(https://blogger.googleusercontent.com/img/b/R29vZ2xl/AVvXsEjdml5nqjfzzUVlyI-rP-OtedtgozvOnBvzwABkTJ3-d5r8rvGIqJdsYj05m83VH9jjZ94jpNt4zoLwB4osTkaizg4pD15q8iExPq41qJP18OvrJ4WjzoNJg17sUJHM4pPqM8iJ6veeGnmx/s1600/menu_mid.gif) repeat-x top left;

height: 32px;

line-height: 35px;

display: block;

float: left;

}

a .menu-right {

background: url(https://blogger.googleusercontent.com/img/b/R29vZ2xl/AVvXsEgHOzihSSphl10VRfXQhS9M30br1wFn1Ezi3VRJByEnX1J-Xk4OxpDmHSpqxrrSDQHpKBzk6w6McEXWtSmcG6aFgAn2NsmBlXzEsOSiz64DjRCPISq99T9pkIH1kJlFXiet4jiPtiXGg4E6/s1600/menu_right.gif) no-repeat top left;

width: 8px;

height: 32px;

line-height: 35px;

display: block;

float: left;

}

.nav li a:hover .menu-left,

.nav li.active a .menu-left,

.nav li:hover a .menu-left,

.nav li a:hover .menu-mid,

.nav li.active a .menu-mid,

.nav li:hover a .menu-mid,

.nav li a:hover .menu-right,

.nav li.active a .menu-right,

.nav li:hover a .menu-right {

background-position: 0 -37px;

line-height: 35px;

}

.nav li a:hover,

.nav li.active a,

.nav li.hover a,

.nav li:hover a {

color: #09548B;

}

.nav li:hover .sub,

.nav li.hover .sub {

display:block;

}

.nav li .sub {

display: none;

position: absolute;

top: 27px;

left: 6px;

background: url(https://blogger.googleusercontent.com/img/b/R29vZ2xl/AVvXsEghOUR6rRa7nmP95pW2ApdOGL1Fplx9NPhk6EhmPXj0EZkzIo1hlglpzj3WqmZYVSgKnx60iluLK91VxXdrhYxVYUE_K9df5-Qp3wlZMcRrAQHBY2QSQjuXBVCLslfwvvi02SA3dXU7inuQ/s1600/submenu_top.png) no-repeat;

width: 186px;

padding-top: 9px;

}

.nav li ul {

background: url(https://blogger.googleusercontent.com/img/b/R29vZ2xl/AVvXsEimXU9NYT2kOsy1QZwwqIdBeBzKoKPhNnEkcDaWv9xN5DqiuPnLNqLpeeahCbf41NqnLDK_XBnNeL4V0iUVNNIacI6ImtdveVN3qBcvqjS5KgOSH-Bk9l71so2n4uXdwVbZguZjRDD7XV9F/s1600/submenu_bg.png) repeat-y;

width: 162px;

height: auto;

margin: 0;

padding: 0 12px 10px;

list-style: none;

font-size: 14px;

}


.nav li:hover li,

.nav li.active li {

width: 100%;

padding: 1px 0 2px;

border-bottom: 1px #C1D9F0 dashed;

background: none !important;

}

.nav li:hover li a,

.nav li.active li a {

color: #09548B;

background: none !important;

line-height: normal;

width: 156px;

padding: 8px 3px 3px;

text-indent: 1px;

}

.nav li:hover li a:hover,

.nav li.active li a:hover {

color: #fff;

background: #165B9F !important;

text-decoration: none;

line-height: normal;

}

/*IE*/

.nav li li a:hover,

.nav li li a:hover {

color: #fff;

background: #165B9F !important;

text-decoration: none;

line-height: normal;

}

/**/

.nav .btm-bg {

background: url(https://blogger.googleusercontent.com/img/b/R29vZ2xl/AVvXsEjnUGgT1WUqWsua7Kfp_2Oy0kB5x38gFZ17H9y7Z5xZ9daUVvAw7Q0a1Fjat3WBa4YFi9j4kO9CGpnXsfsburlTvzCeIsAdqDU6W-0bp2GJfjLJ5TN4N8CSrOiTVU0UnzvDQChfUpDsA4_L/s1600/submenu_bottom.png) no-repeat;

width: 205px;

height: 9px;

overflow: hidden;

clear: both;

}

.content {

width: 670px;

background: transparent url(https://blogger.googleusercontent.com/img/b/R29vZ2xl/AVvXsEhRpHY5RCLOLbGNa0-Zk-LHOTkjoHpIAQJm6EDKgdhACcNF8xKMLk-TzHr5S7w4v2iLJSfTTkr_jPRvKFzwTiMi0UpRv7rZX1CfXfB2nE-A3kC8tJwHMeqmb19pY9RtoF_Tl4Z7TydEu2qR/s1600/content_bg.png) repeat-y;

float: left;

padding: 10px 20px;

}

.content h1 {

color: #333;

font-weight: 400;

text-transform: uppercase;

font-size: 18px;

border-bottom: 1px dashed #C1D9F0;

}

.content h2 {

font-weight: 400;

text-transform: uppercase;

font-size: 14px;

padding-left: 10px;

margin-bottom: -5px;

}

.content p {

padding: 0 15px;

text-align: justify;

}

.content-bottom {

width: 710px;

background: transparent url(https://blogger.googleusercontent.com/img/b/R29vZ2xl/AVvXsEiAx-vksrCdIE2DoR3VBIyeH0NGAcb-iRbz5pYh1UVeRHAUGcUzy7I2IU1y9MTVFcBobiWCcomXCJpmC5g82ZNZUWJSvcVWQgNmgcGkBd5WR0CVMJTQIG9PUCwXZWc1A4zrHoknIR36FMRL/s1600/content_bottom.png) no-repeat;

height: 13px;

float: left;

}

5. Now Go to Design >>page Element

6.Click Add gadget (under your header)  and Select HTML/JavaScript 

7. Now paste paste below code

<div class="wrapper1"><div class="wrapper">

<div class="nav-wrapper">

<div class="nav-left"></div>

<div class="nav">

<ul id="navigation">

<li class="active">

<a href="#">

<span class="menu-left"></span>

<span class="menu-mid">Home</span>

<span class="menu-right"></span>

</a>

</li>

<li class="">

<a href="#">

<span class="menu-left"></span>

<span class="menu-mid">Blog</span>

<span class="menu-right"></span>

</a>

<div class="sub">

<ul>

<li>

<a href="#">Archives</a>

</li>

<li>

<a href="#">Categories</a>

</li>

<li>

<a href="#">Top-rated Posts</a>

</li>

<li>

<a href="#">Most-viewed Entries</a>

</li>

</ul>

<div class="btm-bg"></div>

</div>

</li>

<li class="">

<a href="#">

<span class="menu-left"></span>

<span class="menu-mid">Development</span>

<span class="menu-right"></span>

</a>

<div class="sub">

<ul>

<li>

<a href="#">Wordpress Themes</a>

</li>

<li>

<a href="#">Wordpress Plugins</a>

</li>

<li>

<a href="#">Mac OS X</a>

</li>

</ul>

<div class="btm-bg"></div>

</div>

</li>

<li class="">

<a href="#">

<span class="menu-left"></span>

<span class="menu-mid">Tutorials</span>

<span class="menu-right"></span>

</a>

<div class="sub">

<ul>

<li>

<a href="#">Photoshop</a>

</li>

<li>

<a href="#">Illustrator</a>

</li>

<li>

<a href="#">Css, Html</a>

</li>

<li>

<a href="#">Post Your Tutorial!</a>

</li>

</ul>

<div class="btm-bg"></div>

</div>

</li>

<li class="">

<a href="#">

<span class="menu-left"></span>

<span class="menu-mid">Gallery</span>

<span class="menu-right"></span>

</a>

<div class="sub">

<ul>

<li>

<a href="#">Personal Photos</a>

</li>

<li>

<a href="#">My Friends</a>

</li>

<li>

<a href="#">Tech</a>

</li>

</ul>

<div class="btm-bg"></div>

</div>

</li>

<li class="">

<a href="#">

<span class="menu-left"></span>

<span class="menu-mid">Portfolio</span>

<span class="menu-right"></span>

</a>

<div class="sub">

<ul>

<li>

<a href="#">My Works</a>

</li>
</ul>

<div class="btm-bg"></div>

</div>

</li>

<li class="last">

<a href="">

<span class="menu-left"></span>

<span class="menu-mid">Contact</span>

<span class="menu-right"></span>

</a>

</li>

</ul>

</div>

<div class="nav-right"></div>

</div>

<div class="content">

<p>&nbsp;</p>

<p>&nbsp;</p>


</div>

<div class="content-bottom"></div>

</div>

</div>

Replace # your URL
Replace Blue color words with any names like.
There have many link and name you can change.

8. Now save  HTML/JavaScript  
You are done.
                                                                                                                          COLLECTED FROM
                                                                                                                                                                www.bloggertrix.com

Put Adsense code In Middle blog Post

If you put  adsense code middle in the post, easy to get click frequently.So it wil help to earn more money.Try these.

1. First of all you have to  parse the code.Go to these link  and parse the code.AdParser.

2.After log in to your blogger account and  go to dashboard >> Layout >> Edit HTML

3. Check THE "Expand Widget Templates" and find this code by using Ctrl+F
                               <data:post.body/>

4.Now replace above code with this below code.


      <div expr:id='"aim1" + data:post.id'></div>
        <div style="clear:both; margin:10px 0">
           <!-- Your AdSense code here -->
          </div>
             <div expr:id='"aim2" + data:post.id'>
                <data:post.body/></div>

<script type="text/javascript">
var obj0=document.getElementById("aim1<data:post.id/>");
var obj1=document.getElementById("aim2<data:post.id/>");
var s=obj1.innerHTML;
var r=s.search(/x3C!-- adsense --x3E/igm);
if(r>0) {obj0.innerHTML=s.substr(0,r);obj1.innerHTML=s.substr(r+16);}
</script>

5. Now save the template. Now put this special code to your every post.
     <!-- adsense -->  this is the place you  want to put your adsense code.
6. Cheers.

Submit your post to 250 social bookmark sites with One click

Submit your post to 250 social  bookmark sites with One click


 Now you can easily submit the whole site to up to 250 social and bookmark sites at once.


Click here visit the link

After fill the blanks, you can click generate.you are done.
Related Posts Widget for Blogger

How to add Facebook Twitter Rss follower counter for blogger


1. Log in to blogger and Go to  Design >> Page Element

2.Now click Add Gadget and select the HTML/Javascript

3.Now paste below code.

<style> 
.rss-mbt { 
    background: url(https://lh5.googleusercontent.com/_u4rBCfM4eII/TXM3kMMZ6iI/AAAAAAAABWs/mvD4oZKpcYA/RSS1.png) no-repeat; 
    height: 64px; 
    padding: 0px 20px 0px 80px; 
    margin-top: 20px; 
}
.twitter-mbt { 
    background: url(https://lh4.googleusercontent.com/_u4rBCfM4eII/TXM4FmiiE3I/AAAAAAAABW0/aXFjV0nLT7Q/TWITTER1.png) no-repeat; 
    height: 64px; 
    padding: 0px 20px 0px 80px; 
    margin-top: 20px; 
}
.facebook-mbt { 
    background: url(https://lh3.googleusercontent.com/_u4rBCfM4eII/TXM3FmsFCZI/AAAAAAAABWg/2fp5bNd5HWY/FACEBOOK1.png) no-repeat; 
    height: 64px; 
    padding: 0px 20px 0px 80px; 
    margin-top: 20px; 
}
.follower-rss, .follower-twitter, .follower-facebook { 
    font-family: Georgia,  sans-serif, Times; 
    font-size: 1.1em; 
        font-style:italic; 
        color:#289728; 
}
.follower-rss span { 
    font-size: 1.9em; 
    font-weight: bold; 
        font-style:italic; 
        color:#FFB93C;     
}
.follower-twitter span { 
    font-size: 1.9em; 
    font-weight: bold; 
        font-style:italic; 
        color:#6DB6E6;     
}
.follower-facebook span { 
    font-size: 1.9em; 
    font-weight: bold; 
        font-style:italic; 
        color:#3889BA;     
}
</style>
<div class="rss-mbt"> 
<div class="follower-rss"> <span>515</span> loyal readers 
</div> 
<a href="ADD RSS FEED URL HERE" rel="nofollow">RSS feed</a> 
| <a href="ADD RSS EMAIL FEED URL HERE" target="_blank" rel="nofollow">E-mail</a> 
</div>
<div class="twitter-mbt"><div class="follower-twitter"><span>1058</span> followers</div>                            
<a href="ADD YOUR TWITTER URL HERE" target="_blank" rel="nofollow" title="I definitely follow you back">Follow us on Twitter!</a> 
</div>                       
<div class="facebook-mbt">                        
<div class="follower-facebook"><span>260</span> followers                            </div>                            
<a href="ADD YOUR FACEBOOK URL HERE" target="_blank" rel="nofollow">Join us on Facebook!</a> 
</div>

* Replace  ADD RSS FEED URL HERE with your Rss feel URL
* Replace  ADD RSS EMAIL FEED URL HERE  with your Rss email URL
* Replace  ADD YOUR TWITTER URL HERE with your Twitter account URL
* Replace  ADD YOUR FACEBOOK URL HERE with your Facebook URL

4. Now click save . you are done.
                                                                                                                                                                                COLLECTED FROM
www.bloggertrix.com
Tuesday, June 21, 2011 | By: Unknown

Add Google +1 Button To WordPress And Blogger


Google has officially launched +1 button before an hour. So here is our little guide on how to add the official Google +1 button on your WordPress and Blogger blog.

google plus for wordpress and blogger

For Blogger

Go to Edit HTML and search for <head>. Soon after that place the below code
<script type="text/javascript" src="http://apis.google.com/js/plusone.js">
</script>
Now the next step is to place the Google +1 in the post area. To do that search for <div class="post-header-line-1"/> or <data:post.body/> and place the below code immediately after it
<div style='float:right; margin-right:10px;'>
<g:plusone expr:href='data:post.url'></g:plusone>
</div>
Google offers four different types of button from which you can select any one of those. For more information kindly check the post footer

For WordPress

WordPress users go to header.php search for </head> and immediately before that place the following code
<script type="text/javascript" src="http://apis.google.com/js/plusone.js"></script>
Next up is placing the button where you actually want on your blog, so go to single.php and place the following code where you want it to display
<g:plusone href="<?php the_permalink(); ?>"></g:plusone>

Options

As I said, Google offers 4 different types of button
size="small"  - To display small size +1 button of 15px
size="medium" - To display medium size +1 button of 20px
size="large" - To display large size +1 button of 60px
For an example if you want large button, check this example
<g:plusone size="tall"></g:plusone>
 
For more details check out Google +1 resource from Google

Floating Share Button For Blogger

               Share buttons are very popular among the bloggers, and with the popularity the presentation of the share buttons has really changed alot. Now in this post, I'll teach you how to create an Floating Share Buttons for your blog.
Floating share buttons has now been very popular as it is preferred by many big site like Mashable. As these buttons are very good looking and effective on attracting readers to share buttons, these buttons have been in demand for long.

So regarding that I've written this post to teach you how to add it to your blog. Just follow these steps:

Now open blogger.com> go to Design>go to edit html page> Check Expand Widget Templates


now search for ” ]]></b:skin> “ and add the below mentioned code just above it, do not include ” while copying the code

position:fixed;_position:absolute;bottom:0px;left:0px;clip:
inherit;_top:expression(document.documentElement.scrollTop+document.documentElement.clientHeight-this.clientHeight);_left:expression(document.documentElement.scrollLeft + document.documentElement.clientWidth – offsetWidth);}
#float_corner {padding: 5px;
border-bottom: 1px solid #e8e8e8;
now save your template. now here is the second stage of adding the code. now search for “</body>” code in your template, and add the below mentioned code just above “</body>” code. Do not add ” while copying the code

<div id=’float_corner’>
<ul>
<script type=’text/javascript’>
(function() {
var s = document.createElement(&#39;SCRIPT&#39;), s1 = document.getElementsByTagName(&#39;SCRIPT&#39;)[0];
s.type = &#39;text/javascript&#39;;
s.async = true;
s.src = &#39;http://widgets.digg.com/buttons.js&#39;;
s1.parentNode.insertBefore(s, s1);
})();
</script><a class=’DiggThisButton DiggMedium’/><br/>
<script src=’http://tweetmeme.com/i/scripts/button.js’ type=’text/javascript’/><br/>
<a class=’google-buzz-button’ data-button-style=’normal-count’ data-locale=’en_IN’ href=’http://www.google.com/buzz/post’ title=’Post on Google Buzz’/>
<script src=’http://www.google.com/buzz/api/button.js’ type=’text/javascript’/><br/>
<script badgetype=’square’ src=’http://d.yimg.com/ds/badge2.js’ type=’text/javascript’>
ARTICLEURL
</script><br/>
<a href=’http://www.facebook.com/sharer.php’ name=’fb_share’ type=’box_count’>Share</a><script src=’http://static.ak.fbcdn.net/connect.php/js/FB.Share’ type=’text/javascript’/><br/>
<a href=’http://templates-widgets.blogspot.com/2011/03/floating-share-button-for-blogger.html>Get This</a><br/>
</ul>
</div>
Now save your template and check out your blog. you can adjust the position of the widget by editing ” position:fixed;_position:absolute;bottom:0px;left:0px;clip: ” part of code.
You can change the following attributes : bottom :left
Change them to make the image appear were you like :
top left
top right
bottom left
bottom right


UPDATE 


Adding Floating share Button In sidebar for Blogger


1. Login to blogger account.

2. Go to design --> page Elements


3. Click Add A Gadget.

4. In Add A Gadget window, choose HTML/Javascript .
5. Copy the code below and paste it inside the content box.

<style>
#sharebar {position:fixed; bottom:15%; margin-left:-71px; float:left; border-radius:5px;-moz-border-radius:5px;-webkit-border-radius:5px;background-color:#fff;padding:0 0 2px 0;z-index:10;right:0;}
#sharebar .sbutton {float:left;clear:both;margin:5px 5px 0 5px;}
.fb_share_count_top {width:48px !important;}
.fb_share_count_top, .fb_share_count_inner {-moz-border-radius:3px;-webkit-border-radius:3px;}
.FBConnectButton_Small, .FBConnectButton_RTL_Small {width:49px !important; -moz-border-radius:3px;-webkit-border-radius:3px;}
.FBConnectButton_Small .FBConnectButton_Text {padding:2px 2px 3px !important;-moz-border-radius:3px;-webkit-border-radius:3px;font-size:8px;}
</style>
<div>
<div id="sharebar">
<a href="http://templates-widgets.blogspot.com/2011/03/floating-share-button-for-blogger.html">Source</a>

<div class="sbutton" id="fb">
<a href="http://www.facebook.com/sharer.php" name="fb_share" type="box_count">Share</a><script src="http://static.ak.fbcdn.net/connect.php/js/FB.Share" type="text/javascript">
</script>
</div>
<div class="sbutton" id="rt">
<script src="http://tweetmeme.com/i/scripts/button.js" type="text/javascript">
</script>
</div>
<div class="sbutton" id="su">
<script src="http://www.stumbleupon.com/hostedbadge.php?s=5">
</script>
</div>
<div class="sbutton" id="digg">
<script src="http://widgets.digg.com/buttons.js" type="text/javascript">
</script>
<a class="DiggThisButton DiggMedium" href=""></a>
</div>
<div class="sbutton" id="gb">
<a class="google-buzz-button" data-button-style="normal-count" href="http://www.google.com/buzz/post" title="post on google buzz">
<script src="http://www.google.com/buzz/api/button.js" type="text/javascript">
</script>
</a>

</div>
</div>
</div>

Submit to Search Engines to Boost Blog Traffic

Help Search Engines Find Your Blog by Letting Them Know Where It Is 

    An easy way to give your blog a traffic boost is by letting the popular search engines know your blog exists. Of course, many of them will find your blog eventually, but why not help them along by taking the time to submit your blog's URL to some of the most popular search engines?

Follow the links below to submit your blog's URL to some of the web's most popular search engines:


           Remember, submitting your URL to search engines won't suddenly bring an overwhelming amount of traffic. However, it does mean your blog is on the search engines' radar screens and has a chance of being picked up by keyword searches.