Showing posts with label TEMPLATE EDITING. Show all posts
Saturday, February 4, 2012 | By: BG4U-BLOGS

How To Change Blog Owner?

Blogger has enabled you to change the owner or Administrator for your blog. You can also use this method to transfer a blog to another Gmail Account.


This is useful when you want to separate your public and private blogs. Then your private profile will not show on your public blog and vice-versa. The profile problem can also be solved by deleting the profile widget and putting in a HTML widget.

STEPS TO TRANSFER BLOG


1. Login to Blogger Dashboard.
2. Click on Settings on Dahboard for the blog you wish to transfer. Under Settings tab click on Permissions.
3. Under Blog Authors click the 'ADD AUTHOR' button. Copy and paste or type in the email address of the person you wish to invite or that of your second email account and click on Invite.
4. Email is sent to the invited account. Open your Gmail for that account and open that Email. You will see the following message :

The Blogger user XXXXX has invited you to contribute to the private blog: BLOG TO BE TRANSFERRED

To contribute to this blog, visit:
http://www.blogger.com/i.g?inviteID=XXXXXXXXX

You'll need to sign in with a Google Account to confirm the invitation and start posting to this blog. If you don't have a Google Account yet, we'll show you how to get one in minutes.

If you are already a Blogger user, please note that this blog uses the new version of Blogger. To post to XXXXX's blog, you will access this new version with a Google account, instead of your Blogger account.

To learn more about Blogger and starting your own free blog visit http://www.blogger.com.

Click the Invite Link.
5. Clicking link opens a new window with :

XXXXX has invited you to contribute to the blog
BLOG TO TRANSFER
http://BLOGTOTRANSFER.blogspot.com/
To join this blog as an author, accept the invitation by signing in with your Account below.
Don't have a Google Account? Create your account now
6. Sign up for Blogger
Once you complete this process, you'll be able to log in to Blogger using your Google account email and password.
Email address INVITED@gmail.com Use a different account
Your name INVITED
Display name The name used to sign your blog posts.
Acceptance of Terms I accept the Terms of Service Indicate that you have read and understand Blogger's Terms of Service

Continue
Click Continue. Blogger.com/home will open with the new blog on your Dashboard. As you are only having a Guest Account you can only post.
7. Then repeat Steps 1 and 2. You will now see your second account as Guest under the Permissions subtab of Settings tab. Click on 'Guest' link and it will change to 'Administrator'.
8. Go to your second (invited) account and under Settings---->Permissions click Remove link for the first account. See the entire process for two bloggers summarized in the picture below :
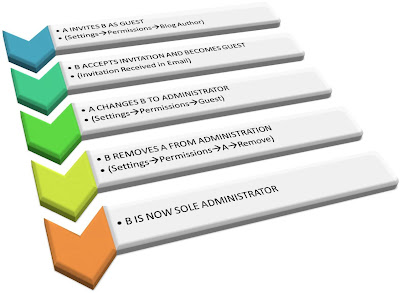

Click on picture to enlarge it.


source : http://www.blogdoctor.me

Css horizontal Menubar for Blogger


This is cool thin menu for your blogger. Follow below step to  add it to your blog.


1. Log in to your blogger account and Go to Design >> Edit HTML

2. Put checked marked in Expand Widget Templates

3. Find this tag by using Ctrl+F    ]]></b:skin>

4. Paste below code Before ]]></b:skin> tag

#pagemenucontainer{height:20px;padding:0 0;margin:5px 0 0 0}
#pagemenu{height:26px;float:left}
#pagemenu,#pagemenu ul{padding:0;margin:0;list-style:none;line-height:1}
#pagemenu{margin-bottom:1px}
#pagemenu ul{float:left;list-style:none;margin:0 0 0 0;padding:0}
#pagemenu li{float:left;list-style:none;margin:0;padding:0}
#pagemenu ul li{list-style:none;margin:0;padding:0}
#pagemenu li a,#pagemenu li a:link{color:#000;display:block;margin:0 2px 0 0;padding:2px 16px;text-decoration:none;text-transform:uppercase;font:normal 11px Arial,Helvetica,sans-serif;background:#ededed;}
#pagemenu li a:hover,#pagemenu li a:active{color:#FFF;display:block;text-decoration:none;background:#c00;}
#pagemenu li.current_page_item a{color:#FFF;text-decoration:none;background:#c00;    }
#pagemenu li:hover,#pagemenu li.sfhover{position:static}

5. Now Go to Design >>page Element

6.Click Add gadget (under your header)  and Select HTML/JavaScript  

7. Now paste paste below code


<div class="widget PageList" id="PageList1">
<div class="widget-content">
<ul id="pagemenu">
<li class="current_page_item"><a href="URL">Home</a></li>
<li><a href="URL">Downlaod</a></li>
<li><a href="URL">Contact</a></li>
<li><a href="URL">FAQ</a></li>
<li><a href="URL">Login</a></li>
<li><a href="URL">Live</a></li>

</ul>
<div class="clear"></div></div></div>


Replace URL With your URL
Replace Blue color words with any names you want to put as menu name.

8. Now save  HTML/JavaScript  
You are done.

Friday, December 16, 2011 | By: BG4U-BLOGS

How To Change Blog Owner?

Blogger has enabled you to change the owner or Administrator for your blog. You can also use this method to transfer a blog to another Gmail Account.


This is useful when you want to separate your public and private blogs. Then your private profile will not show on your public blog and vice-versa. The profile problem can also be solved by deleting the profile widget and putting in a HTML widget.


STEPS TO TRANSFER BLOG


1. Login to Blogger Dashboard.


2. Click on Settings on Dahboard for the blog you wish to transfer. Under Settings tab click on Permissions.


3. Under Blog Authors click the 'ADD AUTHOR' button. Copy and paste or type in the email address of the person you wish to invite or that of your second email account and click on Invite.


4. Email is sent to the invited account. Open your Gmail for that account and open that Email. You will see the following message :

The Blogger user XXXXX has invited you to contribute to the private blog: BLOG TO BE TRANSFERRED

To contribute to this blog, visit:
http://www.blogger.com/i.g?inviteID=XXXXXXXXX

You'll need to sign in with a Google Account to confirm the invitation and start posting to this blog. If you don't have a Google Account yet, we'll show you how to get one in minutes.

If you are already a Blogger user, please note that this blog uses the new version of Blogger. To post to XXXXX's blog, you will access this new version with a Google account, instead of your Blogger account.

To learn more about Blogger and starting your own free blog visit http://www.blogger.com.

Click the Invite Link.


5. Clicking link opens a new window with :

XXXXX has invited you to contribute to the blog
BLOG TO TRANSFER
http://BLOGTOTRANSFER.blogspot.com/
To join this blog as an author, accept the invitation by signing in with your Account below.

Don't have a Google Account? Create your account now


6. Sign up for Blogger
Once you complete this process, you'll be able to log in to Blogger using your Google account email and password.
Email address INVITED@gmail.com Use a different account
Your name INVITED
Display name The name used to sign your blog posts.
Acceptance of Terms I accept the Terms of Service Indicate that you have read and understand Blogger's Terms of Service

Continue
Click Continue. Blogger.com/home will open with the new blog on your Dashboard. As you are only having a Guest Account you can only post.


7. Then repeat Steps 1 and 2. You will now see your second account as Guest under the Permissions subtab of Settings tab. Click on 'Guest' link and it will change to 'Administrator'.


8. Go to your second (invited) account and under Settings---->Permissions click Remove link for the first account. See the entire process for two bloggers summarized in the picture below :


Click on picture to enlarge it.


source : http://www.blogdoctor.me
Sunday, August 7, 2011 | By: Unknown

Image Widget for Blogget

about adiWidget™

adiWidget™ is the pioneer for the static corner image widget for blogger. Developed since September 2007, the idea is now has been used by many other web developer. Instead of static png image, you can now add flash and gif image format in every corner of your blog. But the position of the image is still remain static at the corner of your page. It can be used to give the mood of your web with any image that you want. All of the items here are FREE! So, enjoy then... It is advised that you use the latest browser i.e IE7 and Firefox. adiWidget™ is not compatible with IE6 or below. Please READ the TUTORIAL if you want to know how to apply adiWidget™ in your site. If you have any questions, want to contribute images for adiWidget™ or anything personally, you are welcome to e-mail at adiwira[at]gmail.com.
Wednesday, July 27, 2011 | By: Unknown

How to add Share Buttons on Blogger

1. Go to Design > edit HTML > check “Expand Widget Templates” > Search [ press: CTRL + F ]
<div class='post-footer'>

2. Now REPLACE it with the following code and SAVE
<p><div class='post-share-buttons'>
<b:include data='post' name='shareButtons'/>
</div></p>
<div class='post-footer'>
Wednesday, June 29, 2011 | By: Unknown

Cool Drop Down Menu For Blogger

 This is cool drop down menu for your blogger.


1. Log in to your blogger account and Go to Design >> Edit HTML

2. Put checked marked in Expand Widget Templates

3. Find this tag by using Ctrl+F    ]]></b:skin>

4. Paste below code after ]]></b:skin> tag

.wrapper1{
color: #44433f;
font: 14px "Futura Medium", "Myriad Pro", "Gill Sans", Helvetica, Verdana, Arial, sans-serif;
margin: 0;
padding: 4px 0 0;
}
.wrapper1 a{
color: #E5F2FB;

text-decoration: none;

}

.wrapper1 a:hover {

color: #09548B;

}

.wrapper1 p {

margin: 0 0 17px;

padding: 0;

line-height: 18px;

}

.wrapper {

/*width: 710px;*/

margin: 20px auto;

}

.nav {

background: #fff url(https://blogger.googleusercontent.com/img/b/R29vZ2xl/AVvXsEjjdsNxR-4oB6UI9o18Eiyk5Vpd4KLRb15lE4XX7LapAXlfg_CR6UtxL1ItcKSB-uQy6JuSbiDy8b5Ty0jp4MWM3pJQvppJh-nI4INS5_pHPk51ilIBPJ3VW5btcTMYrJ8JXuK4VRR3tk_L/s1600/nav_bg.png) repeat-x;

float: left;

}

.nev-wrapper {

clear: both;

float: left;

}

.nav-left {

background: url(https://blogger.googleusercontent.com/img/b/R29vZ2xl/AVvXsEg5gaWuBCxgv-81x5P_7udhy2okcT2B7bFQsbUTSC1ueSZSaNKPUDbZjNLGjCeUx8-2KWdQnvjuWY0-b-WJGY2a_dFlx8tCVQkN-fAbynufz9O6cxCRjneZsP5HGNObL-dUCHiDUOqj70Yr/s1600/nav_left.png) no-repeat top left;

float: left;

width: 11px;

height: 41px;

}

.nav-right {

background: url(https://blogger.googleusercontent.com/img/b/R29vZ2xl/AVvXsEjA4Hv9ZyIhZZBFW2D-yhLEPF_3vvZ5QUOUjH88UhodNWfVJaJT1xv2WB0y-xvlLWD6xNRTq-7OAh97PnygfLh8klpphCBQvRM1LVSB05TdNd4aML6NRIxY85gp3XjN997GSaAGf_8pqrA8/s1600/nav_right.png) no-repeat top right;

float: left;

width: 11px;

height: 41px;

}

.nav ul {

/*width: 648px;*/

height: 38px;

float: left;

margin: 0;

padding-top: 3px;

list-style: none;

font-size: 15px;

}

.nav li {

float: left;

padding: 0 7px;

background: url(https://blogger.googleusercontent.com/img/b/R29vZ2xl/AVvXsEixzF1AMaEqBR_mqddHSnJMpTfumEL1ltXjX46sGK_Ehb0mzMHUv39GUvf_IrTkkEIt8EpoUOnNDVDRjLLJftK0J0cKwh7EIRasFqGUrtgyL5WJwkgrO2hV7vhTtJ7mda2sKtEXtQqe3-yR/s1600/split.png) no-repeat right center;

position: relative;

z-index: 1;

}

.nav li.last {

background:none;

}

.nav li:hover {

z-index:2;

}

.nav li a {

display: block;

line-height: 38px;

overflow: hidden;

float: left;

}

a .menu-left {

background: url(https://blogger.googleusercontent.com/img/b/R29vZ2xl/AVvXsEhj1trJM0qe8P80F9snDoIexc8XYMXpNR0MulhwH5Wlt1owAABqvyVASk869IhACBgcsh_xi-wYTJ1d2RYDHf1zv_JrXdqwsLhEetKUYBLQKcLUmU0rX9PwSoqXqNq4tkrwSneEZe0-RLLU/s1600/menu_left.gif) no-repeat left top;

width: 8px;

height: 32px;

line-height: 35px;

display: block;

float: left;

}

a .menu-mid {

background: url(https://blogger.googleusercontent.com/img/b/R29vZ2xl/AVvXsEjdml5nqjfzzUVlyI-rP-OtedtgozvOnBvzwABkTJ3-d5r8rvGIqJdsYj05m83VH9jjZ94jpNt4zoLwB4osTkaizg4pD15q8iExPq41qJP18OvrJ4WjzoNJg17sUJHM4pPqM8iJ6veeGnmx/s1600/menu_mid.gif) repeat-x top left;

height: 32px;

line-height: 35px;

display: block;

float: left;

}

a .menu-right {

background: url(https://blogger.googleusercontent.com/img/b/R29vZ2xl/AVvXsEgHOzihSSphl10VRfXQhS9M30br1wFn1Ezi3VRJByEnX1J-Xk4OxpDmHSpqxrrSDQHpKBzk6w6McEXWtSmcG6aFgAn2NsmBlXzEsOSiz64DjRCPISq99T9pkIH1kJlFXiet4jiPtiXGg4E6/s1600/menu_right.gif) no-repeat top left;

width: 8px;

height: 32px;

line-height: 35px;

display: block;

float: left;

}

.nav li a:hover .menu-left,

.nav li.active a .menu-left,

.nav li:hover a .menu-left,

.nav li a:hover .menu-mid,

.nav li.active a .menu-mid,

.nav li:hover a .menu-mid,

.nav li a:hover .menu-right,

.nav li.active a .menu-right,

.nav li:hover a .menu-right {

background-position: 0 -37px;

line-height: 35px;

}

.nav li a:hover,

.nav li.active a,

.nav li.hover a,

.nav li:hover a {

color: #09548B;

}

.nav li:hover .sub,

.nav li.hover .sub {

display:block;

}

.nav li .sub {

display: none;

position: absolute;

top: 27px;

left: 6px;

background: url(https://blogger.googleusercontent.com/img/b/R29vZ2xl/AVvXsEghOUR6rRa7nmP95pW2ApdOGL1Fplx9NPhk6EhmPXj0EZkzIo1hlglpzj3WqmZYVSgKnx60iluLK91VxXdrhYxVYUE_K9df5-Qp3wlZMcRrAQHBY2QSQjuXBVCLslfwvvi02SA3dXU7inuQ/s1600/submenu_top.png) no-repeat;

width: 186px;

padding-top: 9px;

}

.nav li ul {

background: url(https://blogger.googleusercontent.com/img/b/R29vZ2xl/AVvXsEimXU9NYT2kOsy1QZwwqIdBeBzKoKPhNnEkcDaWv9xN5DqiuPnLNqLpeeahCbf41NqnLDK_XBnNeL4V0iUVNNIacI6ImtdveVN3qBcvqjS5KgOSH-Bk9l71so2n4uXdwVbZguZjRDD7XV9F/s1600/submenu_bg.png) repeat-y;

width: 162px;

height: auto;

margin: 0;

padding: 0 12px 10px;

list-style: none;

font-size: 14px;

}


.nav li:hover li,

.nav li.active li {

width: 100%;

padding: 1px 0 2px;

border-bottom: 1px #C1D9F0 dashed;

background: none !important;

}

.nav li:hover li a,

.nav li.active li a {

color: #09548B;

background: none !important;

line-height: normal;

width: 156px;

padding: 8px 3px 3px;

text-indent: 1px;

}

.nav li:hover li a:hover,

.nav li.active li a:hover {

color: #fff;

background: #165B9F !important;

text-decoration: none;

line-height: normal;

}

/*IE*/

.nav li li a:hover,

.nav li li a:hover {

color: #fff;

background: #165B9F !important;

text-decoration: none;

line-height: normal;

}

/**/

.nav .btm-bg {

background: url(https://blogger.googleusercontent.com/img/b/R29vZ2xl/AVvXsEjnUGgT1WUqWsua7Kfp_2Oy0kB5x38gFZ17H9y7Z5xZ9daUVvAw7Q0a1Fjat3WBa4YFi9j4kO9CGpnXsfsburlTvzCeIsAdqDU6W-0bp2GJfjLJ5TN4N8CSrOiTVU0UnzvDQChfUpDsA4_L/s1600/submenu_bottom.png) no-repeat;

width: 205px;

height: 9px;

overflow: hidden;

clear: both;

}

.content {

width: 670px;

background: transparent url(https://blogger.googleusercontent.com/img/b/R29vZ2xl/AVvXsEhRpHY5RCLOLbGNa0-Zk-LHOTkjoHpIAQJm6EDKgdhACcNF8xKMLk-TzHr5S7w4v2iLJSfTTkr_jPRvKFzwTiMi0UpRv7rZX1CfXfB2nE-A3kC8tJwHMeqmb19pY9RtoF_Tl4Z7TydEu2qR/s1600/content_bg.png) repeat-y;

float: left;

padding: 10px 20px;

}

.content h1 {

color: #333;

font-weight: 400;

text-transform: uppercase;

font-size: 18px;

border-bottom: 1px dashed #C1D9F0;

}

.content h2 {

font-weight: 400;

text-transform: uppercase;

font-size: 14px;

padding-left: 10px;

margin-bottom: -5px;

}

.content p {

padding: 0 15px;

text-align: justify;

}

.content-bottom {

width: 710px;

background: transparent url(https://blogger.googleusercontent.com/img/b/R29vZ2xl/AVvXsEiAx-vksrCdIE2DoR3VBIyeH0NGAcb-iRbz5pYh1UVeRHAUGcUzy7I2IU1y9MTVFcBobiWCcomXCJpmC5g82ZNZUWJSvcVWQgNmgcGkBd5WR0CVMJTQIG9PUCwXZWc1A4zrHoknIR36FMRL/s1600/content_bottom.png) no-repeat;

height: 13px;

float: left;

}

5. Now Go to Design >>page Element

6.Click Add gadget (under your header)  and Select HTML/JavaScript 

7. Now paste paste below code

<div class="wrapper1"><div class="wrapper">

<div class="nav-wrapper">

<div class="nav-left"></div>

<div class="nav">

<ul id="navigation">

<li class="active">

<a href="#">

<span class="menu-left"></span>

<span class="menu-mid">Home</span>

<span class="menu-right"></span>

</a>

</li>

<li class="">

<a href="#">

<span class="menu-left"></span>

<span class="menu-mid">Blog</span>

<span class="menu-right"></span>

</a>

<div class="sub">

<ul>

<li>

<a href="#">Archives</a>

</li>

<li>

<a href="#">Categories</a>

</li>

<li>

<a href="#">Top-rated Posts</a>

</li>

<li>

<a href="#">Most-viewed Entries</a>

</li>

</ul>

<div class="btm-bg"></div>

</div>

</li>

<li class="">

<a href="#">

<span class="menu-left"></span>

<span class="menu-mid">Development</span>

<span class="menu-right"></span>

</a>

<div class="sub">

<ul>

<li>

<a href="#">Wordpress Themes</a>

</li>

<li>

<a href="#">Wordpress Plugins</a>

</li>

<li>

<a href="#">Mac OS X</a>

</li>

</ul>

<div class="btm-bg"></div>

</div>

</li>

<li class="">

<a href="#">

<span class="menu-left"></span>

<span class="menu-mid">Tutorials</span>

<span class="menu-right"></span>

</a>

<div class="sub">

<ul>

<li>

<a href="#">Photoshop</a>

</li>

<li>

<a href="#">Illustrator</a>

</li>

<li>

<a href="#">Css, Html</a>

</li>

<li>

<a href="#">Post Your Tutorial!</a>

</li>

</ul>

<div class="btm-bg"></div>

</div>

</li>

<li class="">

<a href="#">

<span class="menu-left"></span>

<span class="menu-mid">Gallery</span>

<span class="menu-right"></span>

</a>

<div class="sub">

<ul>

<li>

<a href="#">Personal Photos</a>

</li>

<li>

<a href="#">My Friends</a>

</li>

<li>

<a href="#">Tech</a>

</li>

</ul>

<div class="btm-bg"></div>

</div>

</li>

<li class="">

<a href="#">

<span class="menu-left"></span>

<span class="menu-mid">Portfolio</span>

<span class="menu-right"></span>

</a>

<div class="sub">

<ul>

<li>

<a href="#">My Works</a>

</li>
</ul>

<div class="btm-bg"></div>

</div>

</li>

<li class="last">

<a href="">

<span class="menu-left"></span>

<span class="menu-mid">Contact</span>

<span class="menu-right"></span>

</a>

</li>

</ul>

</div>

<div class="nav-right"></div>

</div>

<div class="content">

<p>&nbsp;</p>

<p>&nbsp;</p>


</div>

<div class="content-bottom"></div>

</div>

</div>

Replace # your URL
Replace Blue color words with any names like.
There have many link and name you can change.

8. Now save  HTML/JavaScript  
You are done.
                                                                                                                          COLLECTED FROM
                                                                                                                                                                www.bloggertrix.com